New users can be invited to join a workspace using an invitation link. Invitation templates for each user role configured in Phase 1 are provided under System Administration > Invite Users. Additional user roles can be added by clicking on “Add User Role” on the Invite Users page. Adding a new user role will create:
- A default invitation template for that user role
- Form definitions for that user role in the UX Creator
New invitation templates can be added by clicking on “Add New Invitation Template”, and an existing invitation template can be modified by clicking on its name.
Note: Once a user has accepted your invitation, their account may need to be activated before the user can login to their portal. User accounts can be activated from the “Users” tab under “System Administration” in the left navigation menu.
Overview
Invitation Overview
Use the fields in this section to configure the general settings of your invitation.
Your invitation link can be found in this section. Share this link via email, text, marketing communications, etc., to allow your user(s) to create an account.
Note: Please be sure to have visited all the invitation template tabs and saved your configurations prior to sharing your link to ensure the accuracy of your invitation settings. Changes made to your invitation after the link has been sent out will be reflected in the invitation.
User Security & Privacy
User Type and Initial User State
Invitations for internal user roles are set to an inactive user state by default. This means that an administrator will need to manually activate the user once they have created their account to allow them to gain access to their account
The reason that this secondary step is in place is to ensure the privacy and security of your organization’s internal data. When sharing a link, there is always a risk of interception, which we aim to protect against. This means that if someone accidentally gains access to the invitation link, they won’t be able to complete the registration and access your organization’s data until an administrator manually approves them.
When you share an invitation link for an external user role, the default user state is set to active. This ensures that customers can log in effortlessly, providing a seamless and efficient experience.
The default configurations mentioned above can be altered below; however, we strongly advise against doing so. Proceeding with caution is crucial to protect your organization’s data and ensure your product’s security.
Multiple Joins
Should each user only be allowed to create one account or multiple accounts under the same set of login credentials? If you only want to allow the user to create one account, select ‘No’ for Multiple Joins. This ensures that if a user accidentally uses the invitation link to log in to the account they created, this will NOT create a new account – it will instead log them in their existing account. If you would like to allow users to create multiple accounts using the invitation link, then select ‘Yes’ for Multiple Joins.
In most cases, we recommend setting the multiple joins to ‘No’ as most products intend for each user to only have one account. However, there are cases where you may want to allow for multiple joins, such as wanting to create multiple accounts for testing purposes. In this case, we would recommend selecting ‘Yes’. & Privacy
Welcome Email
A welcome email template can be configured to be sent out to the user(s). This email gets sent out to each user once they successfully create their account and join the workspace. This is a great way to send a personalized welcome message to the user with information you’d like them to know upon joining.
To access this feature, you must first be a workspace owner. Workspace owner configuration can be done from System Administration > Users.
Advanced Features
Join Mail Sequence Initial Email
Configure a series of emails to be sent out to the user upon the creation of their account. This is a great way to send out helpful tips about your product, reminders to perform certain actions, marketing communications, and other features. Email sequences can be configured in Communications Management.
After Join Target
Configure a specific action to be performed with the user account upon the creation of their account. For example, you might choose to have your product trigger a personalized onboarding wizard the first time a user logs in.
Portal
Portal Overview
Note: When the first user signs up, they will create a portal record that they will be in charge of. Any subsequent users who want to join this portal will receive an invitation from the portal owner.
Portal Form
By default, the portal form will be the default landing page for all users of the portal and will display the default user experience for the portal. Although it is possible to override this behavior, the process is complex. For assistance on overriding this behavior, please contact our support team at support@greatideaz.com.
Portal Admin Role
The Portal Admin Role is a specific administration role assigned to the first user who signs up, which enables them to add more users to this portal.
Default Application
By default a portal user will start on the Portal Form Definition. You can override the default application that will first appear when a user logs in to their account here. We recommend selecting a page that will be helpful to the user, such as a get started guide or an application they will frequently use.
Portal Field
Portal Field Label
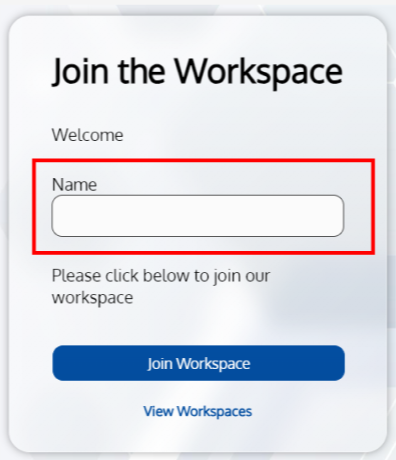
This is the field label used on the first invitation only, and is used to name the portal. Use text that lets the user know that this is where they name their portal – we recommend ‘Name’ or ‘Portal Name’.
Portal XML Element Name
This is the XML name tied to the record that the user enters in the Portal Field, that will be stored in the database.
Advanced Features
Join Existing Portal Mail Sequence Initial Email
Configure a series of emails to be sent out to the user upon the creation of their account. This is a great way to send out helpful tips about your product, reminders to perform certain actions, marketing communications, and other features. Email sequences can be configured in communications management.
Applications
Applications Settings
Applications are the entry points to various functionalities and data that the user will see under their navigation menu on the lefthand side. The user will have access to the applications assigned to them in this section.
Roles
User Roles Settings
User roles define what functionality the user has on the records they have access to.
Invitation Text
Basic Invitation Text Configuration
Use the fields in this section to configure the invitation text that the user sees when they open the invitation link. This is the initial invitation the user sees.
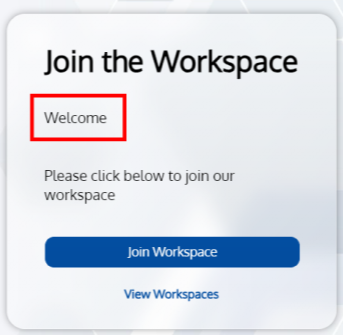
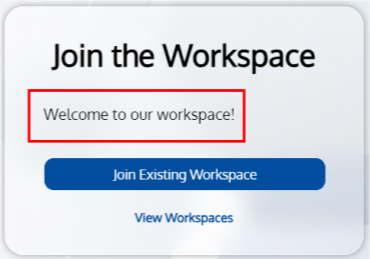
Join Page Content
There are two blocks where you can enter customized text on your user invitation. This is the top block – use this block to write any important information that the user should know once they receive your invitation. We recommend a customized welcome message letting them know what workspace they are about to join.
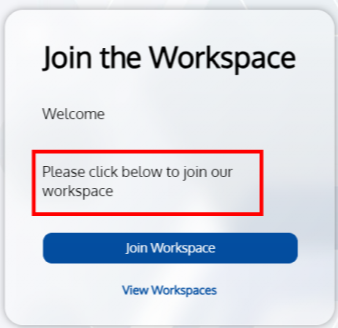
Join Page Bottom HTML
There are two blocks where you can enter customized text on your user invitation. This is the bottom block – use this block to write any additional details the user may need to know prior to joining the workspace.
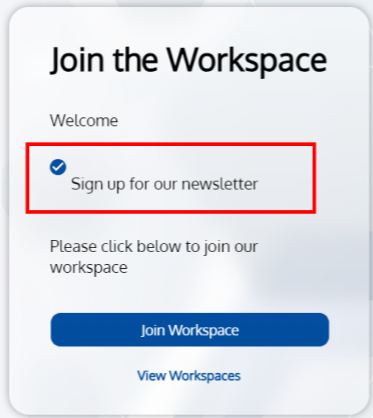
Marketing Subscription
You have the option to add a checkbox for your users to check if they would like enroll in your marketing communications. By adding text to this field, it will also display a checkbox beside it, and whether or not the user has checked the box upon registration will be recorded in the database.
If you would like to make use of this functionality, we recommend adding text appropriate to what the user will be signing up for (for example if you offer a weekly newsletter, we would recommend writing ‘Sign up for our weekly newsletter’).
If you do not want to make use of this feature, leave this field blank and the checkbox won’t be displayed.
Joined Content
If the user is initially set to ‘Inactive’ after creating their account, this is the text they will see once they have successfully created their account and are still waiting for an administrator to activate their account. There are two use cases for this: if the user is internal (unless otherwise configured, internal users will initially be set to inactive), and subsequent portal users who join after the first user.
This is where you should let the user know that they have successfully created their account, however they must wait for an administrator to activate their account before they can login and use the workspace, or that they should contact their administrator to activate their account.
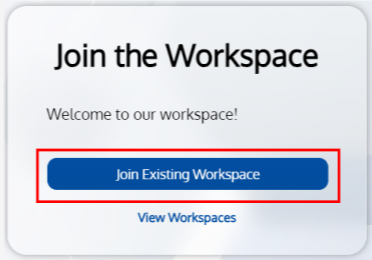
Join Button Text
This is the text that goes on the button that the user will click to join the workspace. Use a call to action to signify to the user that they are about to join the workspace – we recommend ‘Join Workspace’.

Additional Users Joining a Portal Text Configuration
If you’re adding multiple users to this portal, this is the content that all subsequent users will see upon receiving their invitation.
Join Existing Portal Content
This text goes on the invitation that will be used after the first user has registered, to invite additional users to the existing portal. Use this block to write any important information that the user should know once they receive your invitation. We recommend a customized welcome message letting them know what workspace they are about to join.
Join Existing Portal Button Text
This is the text that goes on the button that the user will click to join the workspace. This button goes on the invitation that will be used after the first user has registered, to invite additional users to the existing portal. Use a call to action to signify to the user that they are about to join the workspace.
Legal Terms
Legal Terms Configuration
This is where you build your legal terms; your Terms of Use and your Privacy Policy. The Terms of Use and Privacy Policy are important because they outline the rules for using a service and explain how user data is collected, used, and protected, helping to ensure transparency, legal compliance, and user trust. Your legal terms will be presented to the user during the registration process.
There are two options to configure legal terms:
Legal Terms Template (Standard)
Use the fields below to populate your Terms of Use and Privacy Policy using our pre-built template. This is the easiest way to build your legal terms – you simply need to write text in the fields provided below, and the formatting will be done for you! We recommend this option if you want to quickly build your legal terms in an organized structure.
Customized Legal Terms (Advanced)
If you’re looking to write and format your entire legal copy from scratch, you can use our customized legal terms field. This is an advanced option, and will require more time to plan and format your text. We recommend this option if you have a specific format that you’d like to use for your legal terms that follows a different structure than our pre-built template.
Configuration
Configuration Settings
These are the configuration parameters that the user has set within their account. Parameters defined here override the application’s default settings. If the user made a mistake that is irreversible from their end, changes can be made here by deleting or overriding the parameter.
Parameters and Values
These are the configuration parameters and values that be be added to a user:
- Descriptions
- True/false (default is true)[Determines if the top/bottom descriptions are visible on fields, configurable in the User Profile window]
- Language
- String (default is English)[Determines the language that’s being used for the user, configurable in the User Profile window]
- Marketing
- true/false
- SupressAlerts
- True/false (default is false)[Determines if the Alerts option is available in the user manager dropdown]
- SuppressHistory
- True/false (default is false)[Determines if the History option is available in the user manager dropdown]
- Theme
- String (defaults to value of DefaultThemeName from appsettings.json)[Determines the theme that is currently loaded for the user, configurable in the User Profile window]
- UseDefaultUserProfileIcon
- False (default is true)[Determines if the default user icon will be displayed next to the users name by the user manager dropdown. The default icon is just a user font awesome icon, the non-default is an avatar that will display the users initials.]
- OverrideDefaultApplication
- Guid[When this configuration is present, it will navigate to the specified application guid instead of the users default application when they log in]
- CollapseLeftNavigation
- True/false (Default is false)[This will automatically adjust ad the user toggles the left navigation]