The product creation process consists of three phases:
- Phase 1: Set up the Basics
- Phase 2: Modify & Customize
- Phase 3: Advanced Configurations
Phase 1: Set up the Basics
Define Your Base Data Model & User Roles
In Phase 1 you’ll define your base data model and user roles, laying the foundation for your application. With a push of a button, this information will be used to create your workspace, setting the stage for Phase 2 of the creation process.
Start Your Product Ideation
Welcome to “Phase 1” of building your new product! This phase allows you experiment with your ideas by quickly mapping out an information hierarchy for your product. You will define the key User Roles for your product and their core functionality by creating a set of User Roles and Concepts. At the end of this phase, you will be able to build your product’s workspace that will be scaffolded using the information defined in this phase.
In Phase 2, you will test and validate the information hierarchy created in Phase 1. You may need to iterate multiple times through Phase 1 and Phase 2 in order to perfect your information hierarchy. This is a quick process that allows you to test and experiment with your ideas. Once you have validated your information hierarchy, you can then expand and enhance the user experience using the UX Creator.
In Phase 3, you will unlock all trellispark features, allowing you to refine your product to meet your exact specifications.
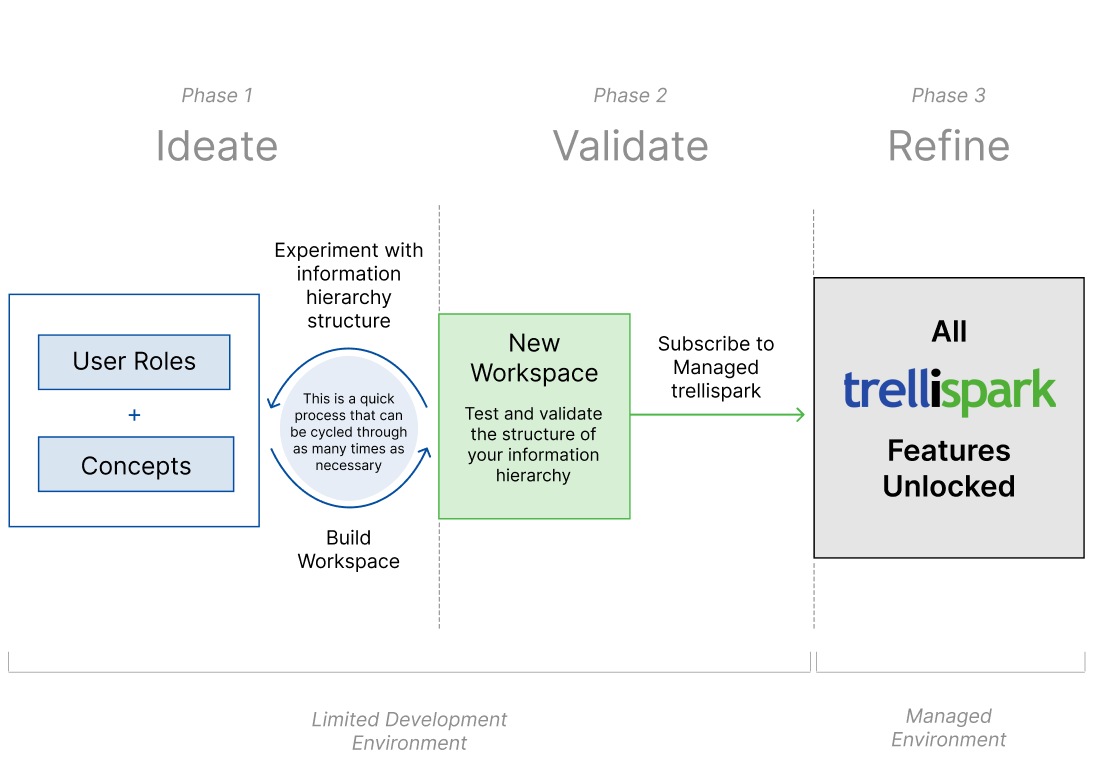
User Roles and Custom Concept Form Definitions
The first thing we recommend you to do is to think about the different types of users that will use your product, and what they need to be able to see and do when they login. The different types of users will determine the User Roles that your product requires, and what these users need to be able to see and do will determine the Concepts that your product requires.

We recommend reading the Get Started: User Roles and Get Started: Concepts articles to get a thorough understanding on setting up your User Roles and Concepts.
Your Information Hierarchy
The combination of your User Roles and Concepts creates your product’s information hierarchy. To better understand and conceptualize how information hierarchies flow, we recommend taking a look at the examples below. You can also find more examples in our Example Functionality Library here.
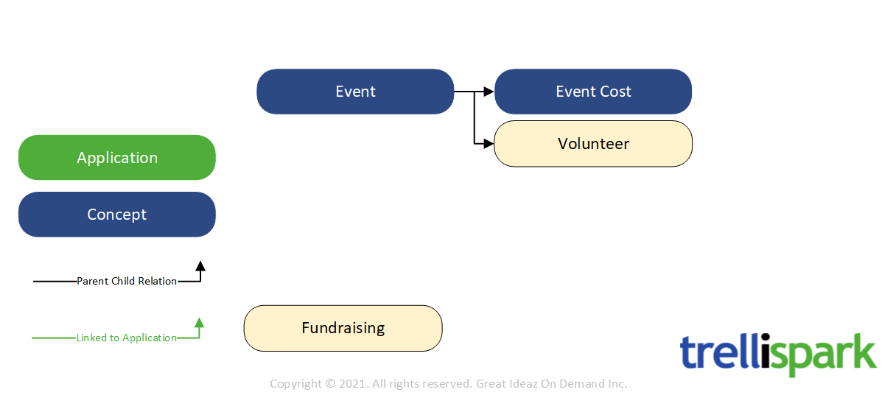
Here is an example of a simple information hierarchy for event management. This would be used for an application that helps you to plan and hold events.
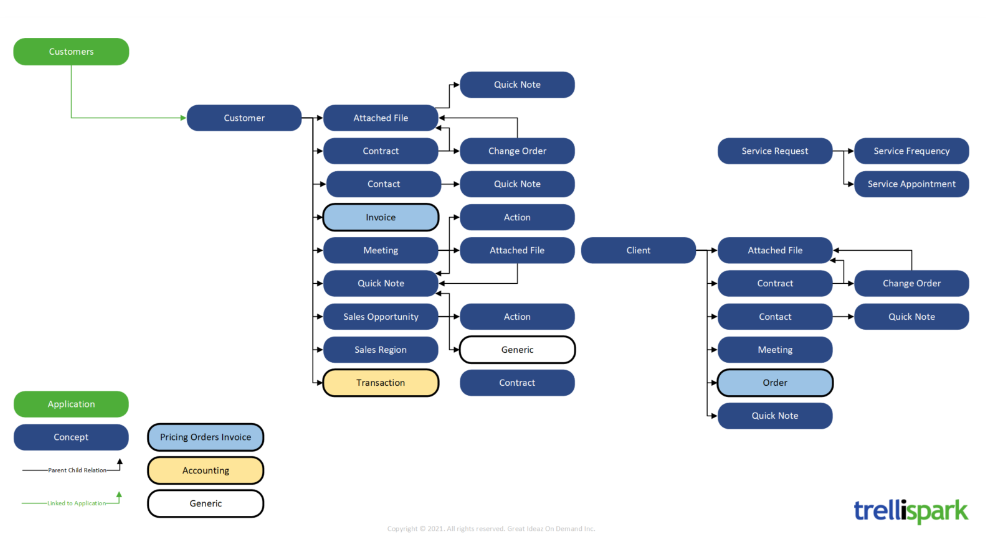
Here is an example of a more complex information hierarchy used for customer and client management. This would be used for an application that helps you to maintain contact with your customers.
Add User Roles
Add the User Roles for your product in the User Roles table. The User Roles created can be modified as many times as necessary. We encourage you to experiment with different ideas when creating User Roles to determine the best structure for your product.
Add Custom Concept Form Definitions
Add the Custom Concepts for your product in the Custom Concept Form Definitions table. The Custom Concepts created can be modified as many times as necessary. We encourage you to experiment with different ideas when creating Custom Concepts to determine the best structure for your product.
Build Workspace
Once you’ve added the User Roles and Concepts needed to define your product’s information hierarchy, build your new workspace by clicking the Build Workspace button!
Phase 2: Modify & Customize
Refine & Expand Your Product’s User Experience
Phase 2 focuses on developing the details of your forms and fields and other aspects that define the base functionality of your product. Leveraging trellispark UX Creator, you’re equipped with an extensive toolkit to configure your unique requirements into a functioning application without writing a line of code (no JavaScript required!).
At this stage, you will now have entered your very own development workspace as an administrator, where you have just unlocked a whole new set of features to experiment with!
Based on the Custom Concepts you defined in Phase 1, we will have scaffolded a set of Form Definitions in the UX Creator. Additionally, based on the User Roles you defined in Phase 1, we will have scaffolded a set of Form Definitions in the UX Creator for External Users, and a set of invitation templates for all Users in System Administration > Invite Users.
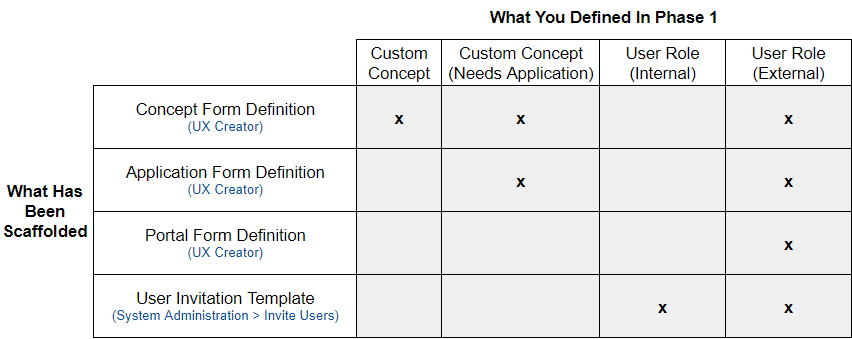
On your lefthand side, you will see your navigation menu – this is where you can start to refine your product. The UX Creator is used to manage and modify existing form definitions specific to your product, and the System Administration is used to manage user roles and invite new users.
Our recommendation:
Validate that your information hierarchy flows correctly prior to making styling enhancements in the user experience. This is the most important part of the process as it defines your product’s underlying structure and workflow. Everything defined in Phase 2 and Phase 3 build on this foundation.
These are the steps we recommend you to take to successfully validate your information hierarchy.
Step 1: Do you have the appropriate User Roles?
Take a look at the User Roles you defined for your product, and analyze whether they are appropriate for the solution that your product is solving.
Step 2: Do the User Roles have access to the type of information they need?
Test your product as the different User Roles (more on inviting new users below), and check to see if they have access to the Applications they should be seeing.
Step 3: Can you collect the information you need?
Add additional Fields in your product’s Forms if necessary (more details on Fields and Forms below) and test the data flow to ensure your product captures the necessary information to effectively address the problem it is intended to solve.
At this point, you should begin to grasp your product’s data flow and its connections with different User Roles. While setting up this foundational structure correctly is crucial, your aim should be to establish enough functional components to lay the groundwork for your product’s functionality. While setting up a production environment requires a Managed Environment (Phase 3), the objective here is to establish a solid foundation upon which you can build.
If any of the User Roles or Custom Concepts need to be added/modified/deleted, go back to Phase 1, delete this workspace, make the necessary changes, and rebuild your workspace. Multiple iterations of this process are typically necessary in order to get the information hierarchy to a point where it accurately defines your product’s underlying data structure.
Once you have validated your information hierarchy, we recommend that you start with the UX Creator to continue to evolve and improve your product’s existing form definitions, and then move to the System Administration to invite new users to use your product (or for you to test your product as a different user role!)
UX Creator
In Phase 1, you defined a set of User Roles and Custom Concepts to define your product’s information hierarchy. Using this information, we have scaffolded a set of Form Definitions, utilizing the provided information as placeholders, that now enables you to start enriching and expanding the user experience.
In Phase 2, you will now enrich and expand this set of Form Definitions to provide the user experience that your product needs. You will do this by using the UX Creator to navigate to the Functionality, access the Form Definitions, and incorporate a series of Field Definitions to achieve the desired user experience.
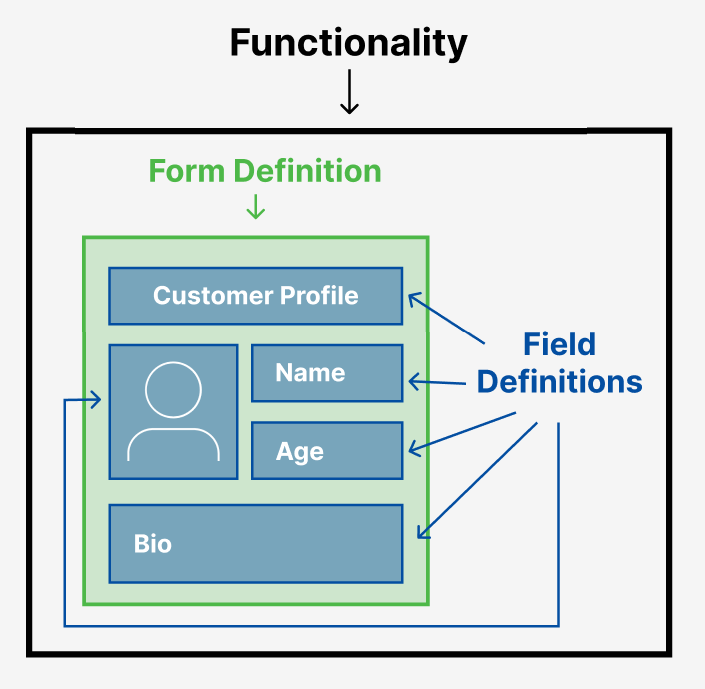
Once you are ready to use the UX Creator, we recommend reading Get Started: UX Creator App to get a thorough understanding on configuring the user experience using the UX Creator.
System Administration
In Phase 1, you defined the baseline security model by identifying the roles of your product users. For each of the User Roles you defined in Phase 1, we have created an equivalent Invite User record to allow you to invite that type of user to your workspace.
Invite Users
Invite Users provides you with a set of user invitation templates to be used when you bring a new user into your workspace to create a new user record. These invitations provide new users with tailored instructions, messages, and action buttons to guide them through the registration process.
Upon successful registration, users will adopt the configurations outlined in their invitation template. This includes their internal or external status, the applications they can access, and the functionality they can perform.
Users
The Users page is where you can see a list of all the users in your workspace and their configuration. A user’s initial configuration is defined by the invitation they used to join the workspace, and can be modified at this stage if necessary.
Once you are ready to invite new users, we recommend reading How to Invite Users to a Workspace and Manage Users to get a thorough understanding on how users work.
Phase 3: Advanced Configurations
Get Ready to Launch Your Product!
In Phase 3, your journey reaches an exciting milestone as you gain access to a dedicated trellispark environment, tailored specifically to your unique needs. You’ll unlock advanced customization features to further refine your user experience. From integration with third-party services to dynamic user interfaces, your application can be crafted to align with your brand identity and user experience goals.
To unlock all features and access advanced capabilities, upgrade to a managed environment by contacting our support team at support@greatideaz.com.