Using Portal Forms
A Portal Form is a special type of Form Definition that defines a restricted user experience a type of user can see when they login to the workspace. For example, you may have several internal customer fields or workflow that you would never want to display on a customer portal.
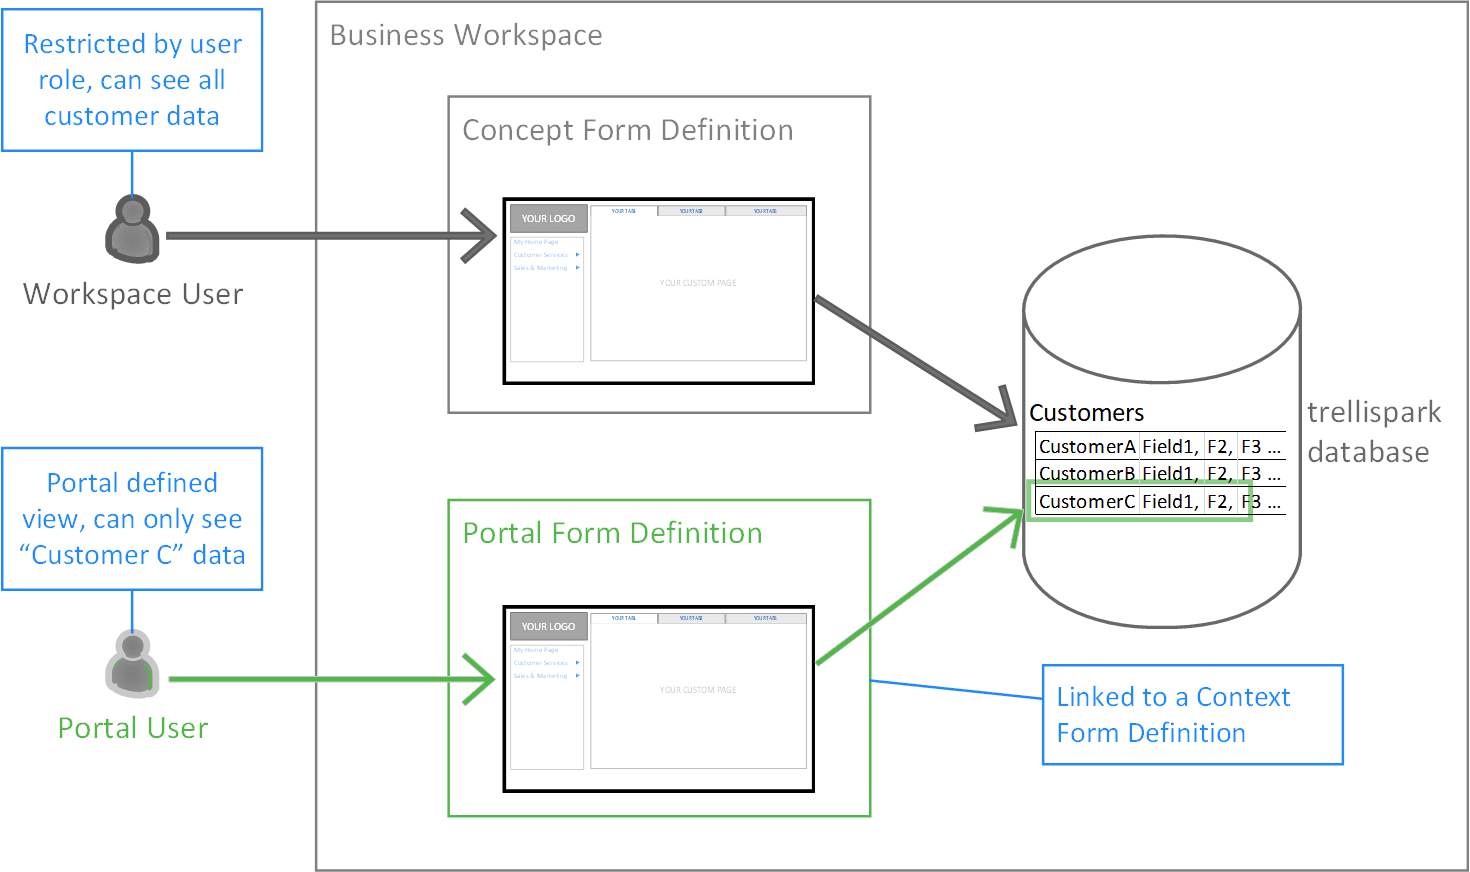
For example, Great Ideaz uses trellispark to provide a customer support website. Each Great Ideaz customer has a tailored user experience and can only see their data. Great Ideaz internal customer support staff can view all customer information and have additional administrative functionality. In this example, a Form Definition is created to define the Great Ideaz customer support user experience, and a Portal Form Definition is created to define the restricted view for Great Ideaz customers.
Creating a Concept Portal Form
Follow these steps to create and configure a Portal Form:
- In the UX Creator application, select the Functionality where you want to create the portal form

- Select the Forms tab and create a new Concept Form that can be used as a base for your new portal form. For example, we can create a Client concept form

- To create your new Portal Form, copy your new concept form and rename it to a name that describes your new portal user experience
- Select the Concept Form that you wish to copy
- Select the copy action from the top right menu (select the three dots)

- Rename the copied form, for example, “My Client Portal”
- Change the Form Type to Portal

- Link the new Portal Form to the original Concept Form

- Edit or remove fields and/or workflow from the new Portal Form Definition you just created until you achieve the user experience you want for your portal users. The portal form will include all the same fields as the original concept. These will need to be customized based on what should be displayed to the users signing in through this portal

IMPORTANT NOTES:
- When you extend your Functionality to allow the creation of customer portals, you must link the Customer Portal Form to the underlying Customer Concept Form. What this means is that every customer record can now be the “context” record for a new customer portal. You can now create customers A, B and C as regular records and then use them to provide “context” records for the customer portal user experience for A, B, and C.
- Name your portal form something that will help identify with the type of users that will visit your workspace (for example, “Supplier Portal”). The purpose should describe what type of external users should be signing up through this portal to allow administrators to easily sort which portal is appropriate for the user they are signing up. For example, all supplier portals will be created from the same supplier portal form and can be personalized with the name of each supplier.
- Portal Type is used to determine how many users will be able to sign up to this portal and use it at a given time. Most portals are likely to be group portals with the first user being created as an administrator who can then add users from within their own organization.
- The fields within a portal are typically a subset of those of the concept upon which the portal was based and can be used to collect specific data about the record, or as a series of tables to allow deeper access.
- The name of the portal can be assigned within the portal by a string, giving administrative users access to change their own name if required. There must be a Manage Portal Users field which is only visible to internal administrator and portal administrators to add, remove, and define access permissions for the other users who have access to this portal.
- In many ways, a portal should be like the concept that stores information about the type of user using the portal. For example, a Supplier Portal should collect the same information that the Supplier concept stores, allowing the users to change and access their portal information directly upon entry to the portal.
- Portals will not define any state transitions (defined on the corresponding Concept) but may need additional commands attached to them to trigger workflow.
Previous article: Creating an Application Form Definition
Next article: Adding Configuration Lists to your Functionality